Crafting Stunning Wood Burnt Pictures: Techniques, Inspiration, and Ideas
Understanding Wood Burnt Pictures
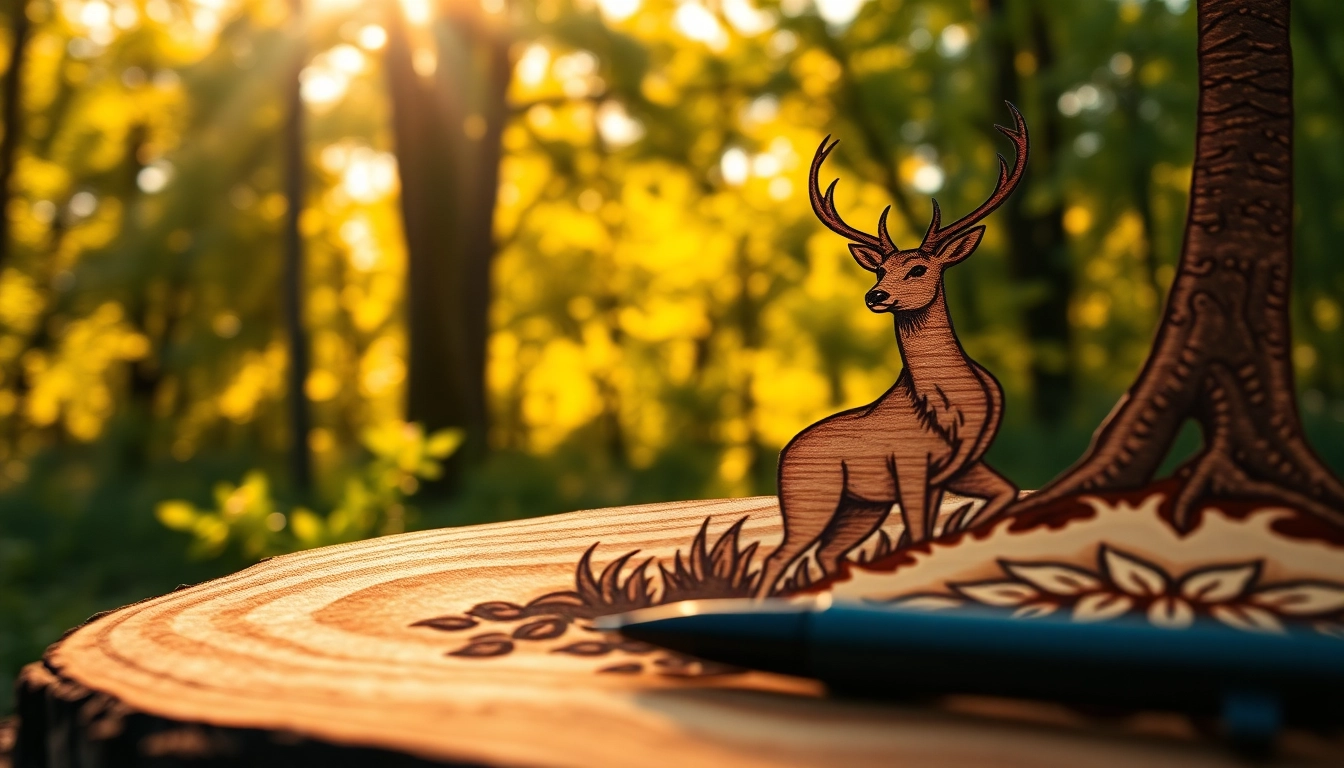
Wood burnt pictures, also known as pyrography, is a captivating art form that involves the use of a heated tool to burn images into wood. This ancient technique not only creates visually striking designs but also allows artists to infuse their personal touch and creativity into each piece. The intricate craftsmanship involved in creating wood burnt pictures makes this art form both rewarding and challenging. In this article, we will explore the art and history of pyrography, essential tools for creating stunning pieces, the types of wood best suited for burning, and so much more. Whether you are a beginner or an experienced artist, you will find valuable insights and inspiration to enhance your wood burnt pictures. To dive deeper into this beautiful art, visit wood burnt pictures to explore further.
The Art and History of Pyrography
Pyrography, which translates to “writing with fire,” has a rich history that dates back centuries. This technique has been used by various cultures around the world, from the ancient Egyptians decorating wooden sarcophagi to Indigenous peoples in North America who adorned everyday items with intricate designs. The earliest known examples of pyrography are found in Africa, where natural fire was used to create patterns on wooden surfaces.
The revival of pyrography during the Victorian era led to increased popularity as it became a favored hobby among the upper classes. This period saw the introduction of specialized tools that expanded the possibilities of wood burning art, paving the way for modern interpretations and techniques.
Today, pyrography is more accessible than ever, with a plethora of tools and resources available for artists of all skill levels. From simple burnings to complex images combining various elements, the potential of wood burnt pictures continues to inspire creators worldwide.
Essential Tools for Creating Wood Burnt Pictures
Creating captivating wood burnt pictures requires specific tools that enhance both the effectiveness and precision of the burning process. Here are the essential tools you will need:
- Pyrography Pen: This is the primary tool for wood burning, available in various tip designs to create different effects. Basic pens come with interchangeable tips, allowing for a range of line widths and textures.
- Wood Selection: Choosing the right type of wood is crucial. Basswood and birch plywood are popular choices due to their smooth surfaces and even grain, making them ideal for details.
- Stencil Kits: While not mandatory, stencils can help beginners trace complex designs easily, providing a foundation to build upon.
- Safety Gear: Always wear protective eyewear and a dust mask when working with wood and heat tools to safeguard against fumes and debris.
- Drawing Materials: A pencil or charcoal pencil is helpful for sketching initial designs directly onto the wood before burning.
Basic Techniques for Wood Burnt Pictures
Starting with Simple Designs
As a beginner, starting with simple designs can provide a strong foundation for your pyrography skills. Geometric shapes, basic patterns, and simple silhouettes allow you to practice controlling the pen while familiarizing yourself with the wood’s reaction to heat. Begin with light pressure to gauge how the wood burns and gradually increase pressure for darker lines.
A common starting project is creating a decorative border around the edges of a piece of wood. This allows you to practice different patterns and techniques without overwhelming detail. As you gain confidence, you can experiment with combining multiple shapes to create more intricate designs.
Mastering Shading and Detailing
Once you are comfortable with basic designs, it’s time to focus on shading and detailing, which are critical for adding depth and realism to your wood burnt pictures. There are various techniques for shading:
- Cross-Hatching: This involves layering parallel lines in different directions to create the illusion of depth and texture.
- Gradual Burning: By varying the pressure and speed of the pen, you can achieve a gradient effect, moving from light to dark tones.
- Dot Stippling: This technique uses numerous tiny dots to build up darker areas, making it effective for detailed work and enhancing textures.
Combining these techniques will allow you to add intricate details to your wood burnt pictures, from the delicate fur on animal portraits to intricate floral patterns.
Safety Precautions When Working with Heat
Handling a pyrography tool requires careful attention to safety. It is crucial to follow these precautions:
- Work in a Well-Ventilated Area: Ensure good air circulation to disperse fumes that may arise from burning wood.
- Keep a Fire Extinguisher Nearby: Always have an extinguisher on hand in case of accidental ignitions.
- Use a Heat-Resistant Surface: Work on a surface that can withstand heat, such as a dedicated workbench or a heat-resistant mat.
- Handle Tools with Care: Always be mindful of the heated pen, and place it on a heat-resistant holder when not in use to prevent burns.
Advanced Skills for Exceptional Wood Burnt Pictures
Combining Painting with Pyrography
For those looking to elevate their wood burnt pictures beyond traditional techniques, combining pyrography with painting opens up a world of creativity. After completing a burnt outline, adding color can significantly enhance the finished piece. Acrylic paints are a popular choice due to their vibrant colors and quick drying time.
To successfully combine these mediums, consider the following:
- Burn First, Paint Later: Complete your pyrography first, allowing the lines to define shapes before introducing color.
- Use Transparent Layers: Build color gradually by using thin, transparent layers to avoid overwhelming the detailed burned textures.
- Seal the Finish: After applying paint, ensure you seal the piece with a clear coat to protect both the paint and the burnt design.
Using Stencils for Complex Patterns
Stencils are excellent tools for enhancing the complexity of your wood burnt pictures. Whether you desire intricate designs or repetitive patterns, stencils allow for quick application and consistency across multiple projects. Here’s how to effectively use stencils:
- Choose High-Quality Stencils: Look for sturdy materials that won’t bend or warp during use to ensure precision in your burned patterns.
- Secure the Stencil: Use a temporary adhesive spray or tape to hold the stencil in place firmly, preventing any movement during the burning process.
- Practice on Scrap Wood: Before using stencils on your final piece, practice on scrap wood to master the technique and ensure the desired effect.
Understanding Color Application and Finishing Touches
Beyond adding paint, understanding how to apply color effectively in pyrography can create a visually striking contrast. Various methods can be applied:
- Wood Stains: Use wood stains to infuse color while allowing the natural wood grain to show through.
- Colored Pencils or Pastels: After burning, colored pencils can add delicate shades, perfect for fine detailing, especially in floral designs.
- Clear Finishing Coats: After all color applications, use a clear varnish to protect the wood and add a polished finish, enhancing the overall appearance.
Creativity and Inspiration for Wood Burnt Pictures
Nature-Inspired Themes and Patterns
Nature offers an endless source of inspiration for wood burnt pictures. Landscapes, flora, and fauna can all be translated beautifully into this art form. Here are some nature-inspired themes to consider:
- Floral Designs: Delicate blossom patterns draw attention, allowing artists to experiment with various shading techniques.
- Animal Portraits: Capturing the essence of wildlife through realistic representations or stylized versions can be a rewarding challenge.
- Landscapes: From serene forest scenes to dramatic mountains, landscapes can showcase various techniques, adding depth and texture to your work.
Personalizing Projects with Custom Designs
Adding a personal touch to your wood burnt pictures can transform a simple piece into something meaningful. Whether it’s commemorating a special occasion, creating a one-of-a-kind gift, or expressing your passions, consider these ideas:
- Incorporating Names or Initials: Personalizing artwork with names or initials can become cherished keepsakes.
- Themed Artwork: Design pieces around hobbies or interests – for instance, illustrating quotes or symbols related to loved activities.
- Custom Portraits: Create custom portraits of pets or family members, offering a unique piece that resonates with the recipient.
Finding Online Communities for Inspiration
The creative world of pyrography thrives within online communities that provide valuable inspiration, resources, and support. Engaging in these platforms can enhance your skills through interaction with other artists. Popular options include:
- Social Media Groups: Platforms like Facebook and Instagram host various groups where artists can share their work and techniques, fostering community support.
- Online Forums: Websites dedicated to woodworking and art often have sections for pyrography, allowing discussion and link sharing.
- Video Tutorials: Many artists offer free video content on platforms like YouTube, providing step-by-step guidance on specific techniques or projects.
Showcasing and Selling Your Wood Burnt Pictures
Best Practices for Displaying Art
The way you display your wood burnt pictures can significantly affect how they are received by viewers. A well-displayed piece draws attention and highlights its unique features. Consider the following best practices:
- Framing Your Artwork: Choose a frame that complements the art style and enhances the overall aesthetic.
- Lighting: Proper lighting can bring out the details of your work—consider natural light or well-placed artificial lights.
- Gallery Style Arrangements: When displaying multiple pieces, consider gallery arrangements, grouping works with similar themes or color schemes.
Online Platforms for Selling Wood Burnt Pictures
For those looking to sell their wood burnt pictures, transitioning into the online marketplace can offer great opportunities. Popular platforms to consider include:
- Etsy: A go-to platform specifically for handmade items, offering opportunities to reach a wider audience.
- Social Media: Harness the power of Instagram and Pinterest to showcase your work and direct potential buyers to your sales platform.
- Your Own Website: Consider setting up an online store to maintain control over your branding and sales process.
Marketing Strategies to Reach Art Enthusiasts
To effectively reach art enthusiasts and potential buyers of your wood burnt pictures, it’s essential to implement smart marketing strategies:
- Content Marketing: Create engaging content around your art process, inspirations, and personal stories behind your pieces, which can be shared on blogs, social media, etc.
- Networking: Engage with local art shows, fairs, and festivals, where you can showcase your work and connect with fellow artists and potential customers.
- Email Newsletters: Build an email list to keep your audience updated on new pieces, specials, or upcoming events.